Archive for category technical
Tire Life Expectancy
Posted by valvejob in Product reviews, technical, Tires on November 18, 2020
For about the last 15 years, I have been keeping track of bike tires I have replaced, and I have accumulated a small database of life spans for 21 tires.
Of course, your mileage will vary — this data is specific to my weight, riding style, payloads, and the surfaces I ride on. The data is messy because it is not well controlled. I can be somewhat arbitrary about the decision to pronounce a tire dead, and some tires succumb to cuts or bruises rather than wear.
Over this period, I have ridden five different bikes, and I have used a range of tires: light performance-oriented tires (lighter than about 11 grams of total tire weight per millimeter of width), practical mid-weight tires (11-15 g/mm), and utilitarian heavy-duty tires (over about 15 g/mm). The light tires are mostly used on paved rural roads that have little glass and other puncture-causing debris, but surfaces that can be rough. The others are used on a combination of rural and urban roads and are exposed to many more puncture and cut hazards, and they carry loads (groceries or camping gear) regularly.
These tires have been about half Panaracers, either under their own label or tagged as Rivendell or Compass/Rene Herse. Other manufacturers represented by at least one tire include Challenge, Continental, Michelin, Specialized, Schwalbe, and Vittoria. There has been a mix of 700c and 650b tires, from 26mm to 45mm wide.
Nearly all tire wear takes place on the rear tire, at least for me, and I tend to rotate tires to maximize their total life. Failure of a front tire can cause a crash, so I am careful not to put a tire on the front that is in questionable condition. The pertinent data is the mileage attained while on the rear wheel, but my dataset is dirtier because many of the tires get some time on the front.
Even with the above caveats about data quality, there are clear tendencies for my rear tires within the three weight classes:
• Light tires last an average of 1800 miles (2900 km).
• Medium-weight tires last an average of 2200 miles (3500 km).
• Heavier touring/utility tires last an average of 2700 miles (4400 km).
Tire width and diameter seem to have little influence on life expectancy, though one might be able to distinguish those factors with a larger and cleaner data set.
After wearing out a set of Paselas right on the above schedule, I began the long process of finding the perfect set of tires for the touring/utility bike. The Snob captures the shopping process pretty well: “It’s no wonder we can spend so much time over tires–not only is there endless potential for superstition, but there’s also massive amounts of hard data, and the result is a powerful synergistic effect that can turn a simple tire purchase into a process more fraught than shopping for a home.”
I wanted tires that had enough puncture resistance for urban use, enough toughness to carry loads on surfaces that are mostly paved but can be broken up, good rolling resistance, reasonable weight, and around 42 mm width.
After extensive consideration, I was guided by Jarno to Schwalbe Marathon Almotion tires. His tests showed that this was a remarkably well-balanced tire, with the puncture resistance and toughness of a heavier urban tire, and the lowest rolling resistance among the tested touring and utility tires. At 750 grams I would not recommend them for criteriums, but weight is the cost one must pay for puncture resistance and general durability.
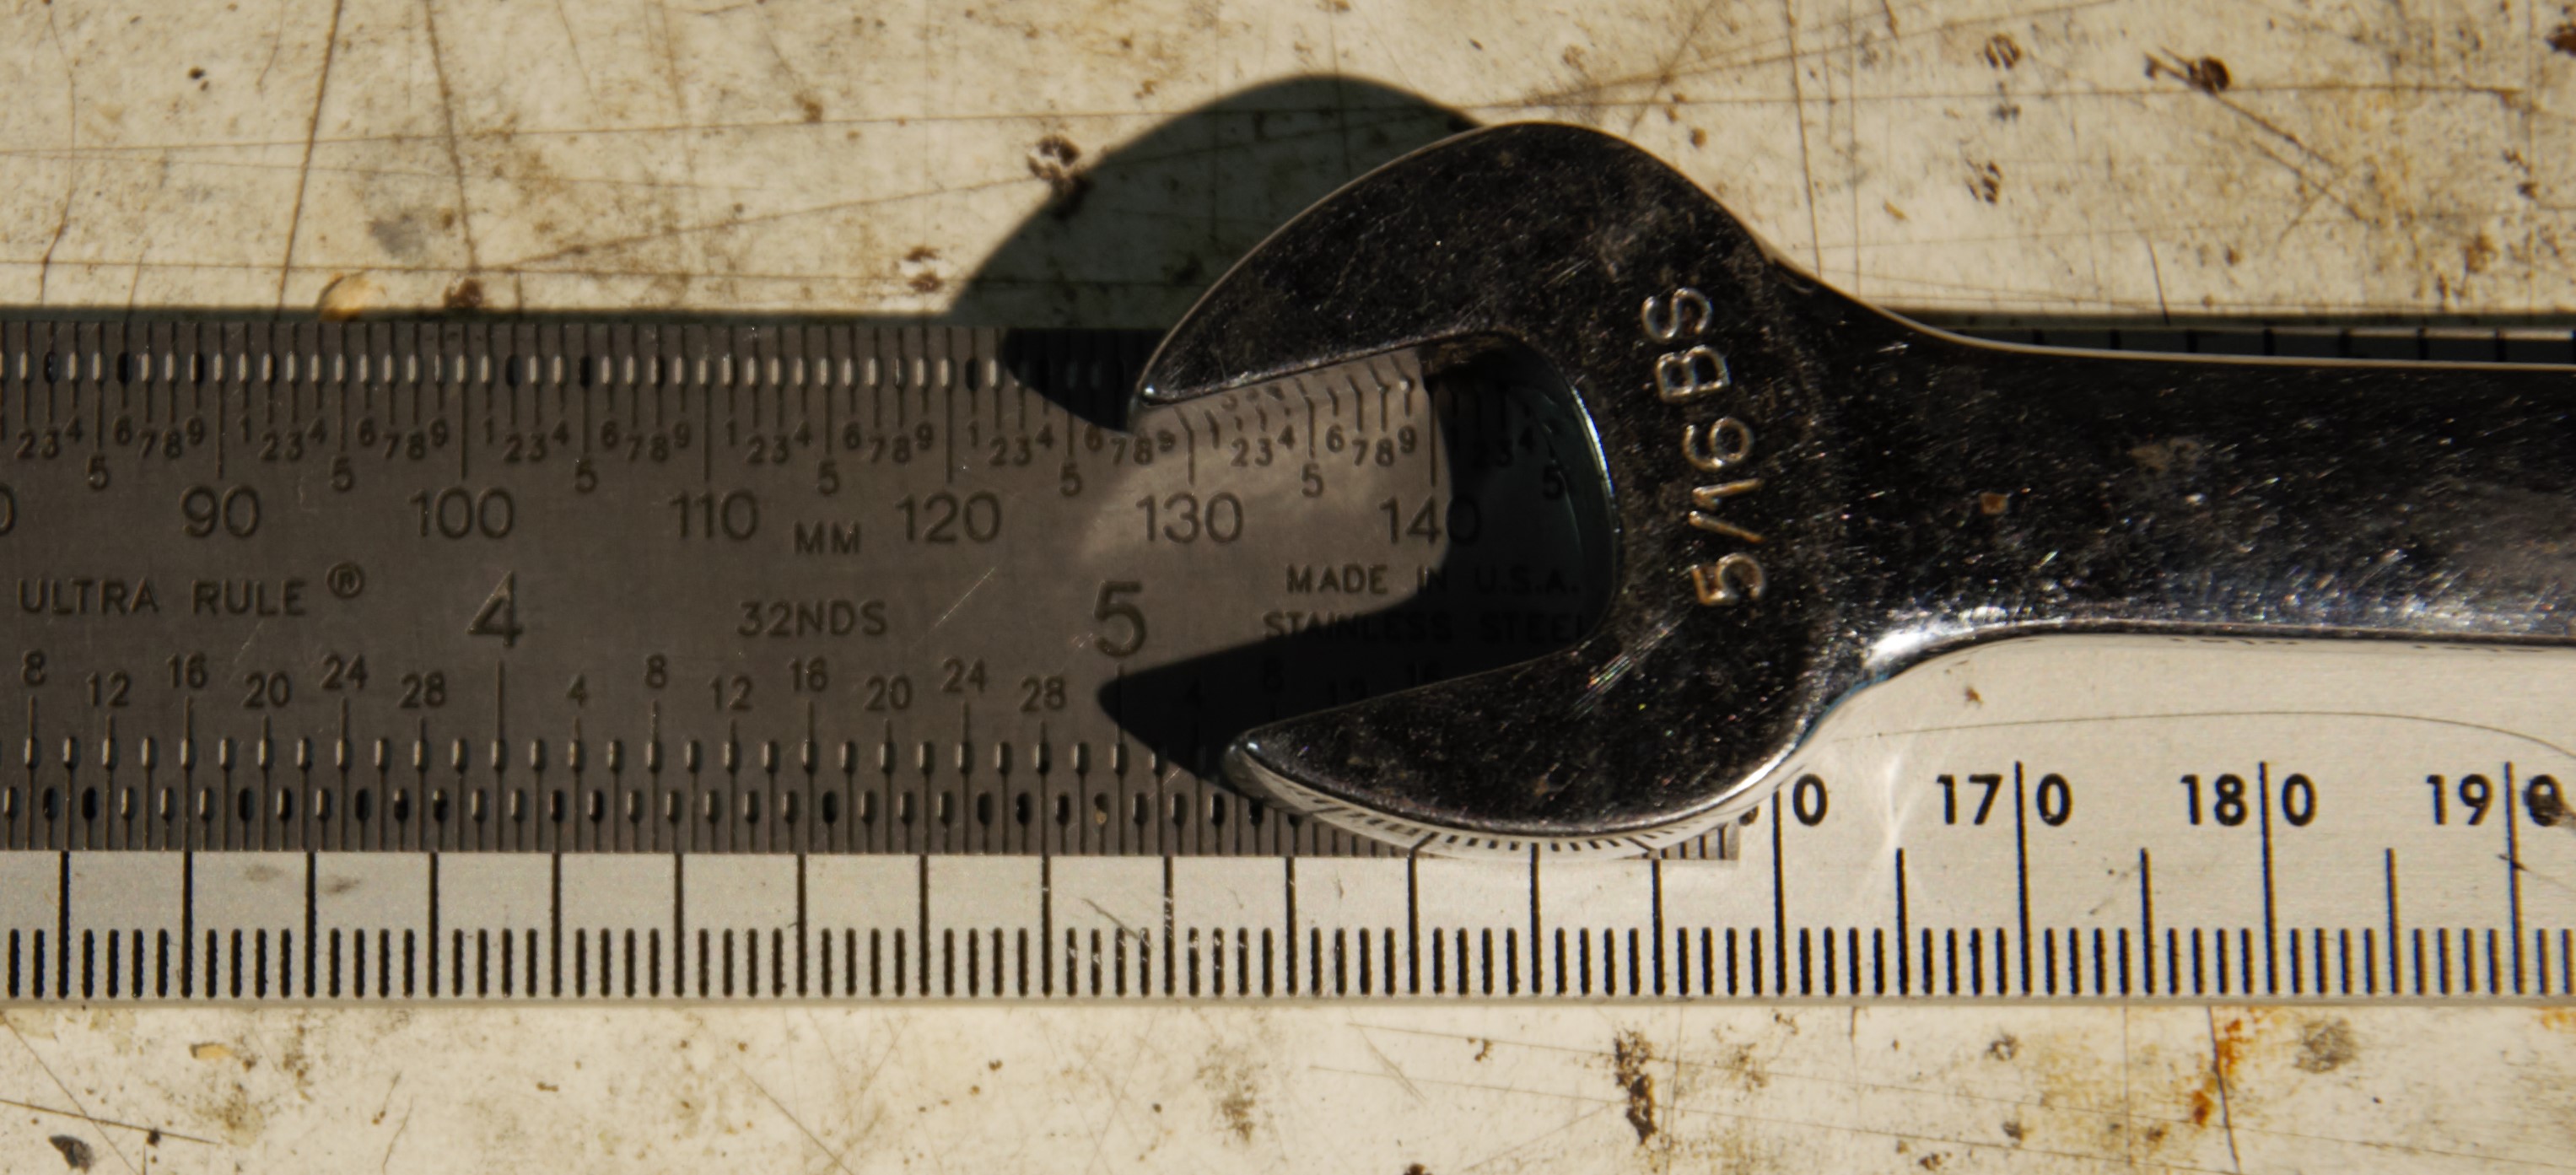
A potential problem was that the only 650b Almotion was labeled 50 mm wide and I was not sure that this bike had enough clearance for a tire that large. My experience with basic Schwalbe Marathons is that they tend to be smaller than the label would indicate, so I took the risk, bought the tires, and discovered that they were only about 42 mm wide mounted on my Atlas rims. This left a comfortable amount of clearance.

The tires checked all my boxes and ride and handle great, and they seemed perfect for my needs.
After a couple of years and 4000 miles, the rear tire showed some wear, so I rotated them. That was two years and well over 6000 miles ago. Both tires still have some tread, though it is getting thin. Both have numerous cuts, and they are cracking from age and flexing. But there is no discernable belt showing, and no chords visible. To my surprise, the front has worn nearly as much as the rear after rotation, but 6000 miles is a lot, even on the front. They are not impervious to punctures, but I have had only a few and I have dug some big chunks of glass out of the rubber. They have stretched minimally in four years and 10,000 miles, and are now about 44 mm wide. They are close to the end of their life but still kicking, at almost twice my average mileage for a heavy-duty tire.

I was so happy with these tires that I decided to replace them in kind for my cross-country trip (delayed due to pandemic). I got on the Schwalbe web site and discovered that they had changed the Almotion specifications since my 2016 purchase. Now they are listed as 55 mm wide and I again have doubts that they will fit this bike.
I took the risk and purchased a pair. This time it did not work out so well. At 53 mm, the new tires measure much closer to their nominal width and clearance is just too tight. I replaced my 50 mm fenders (which barely cover the existing tires) with 60 mm fenders, the comfortable maximum for the fork crown and the Tubus racks. I got another millimeter or two of clearance for the tires, but there still was not enough space, and it is likely that they would rub if anything got out of line, even a little.
So, back to the drawing board. I like the durability and long life of the Almotions. I don’t want to be looking for an appropriate tire in rural Kansas or Utah, and I can be reasonably confident that these would survive the entire trans-am trip (which I still plan to do), even with the increased wear caused by a full touring load. Since I have not seen that kind of life with other tires, I want to stick with high-end Schwalbes.
The closest match to the Almotions is the slightly heavier Marathon Mondial. The major drawback of that tire is that the rolling resistance is significantly higher, presumably because of the knobbier tread. Like the old Almotions, they are labelled 50 mm, and if they are true-to-size I may still have clearance issues. But if I want better rolling resistance, the only choice among the high-end Schwalbes is the Marathon Supreme, which is a much lighter tire that will probably not last nearly as long, and come only in a 42 mm nominal size.
Hedging my bets, I ordered a pair of Supremes (which I know I can use in some combination on one of my bikes) and one Mondial. (Note that 650b Supremes are not listed in the 2021 catalog).
The Supremes measure only 35 mm mounted, which is narrower than I would like for this bike. They will be fine training tires for the rando bike, and I will save the light Rene Herse tires for events.
The Mondial probably has essentially the same casing as the old Almotions, but the substantial side knobs make it a little wider, close to 47 mm. This is about as wide as I would want to go on this bike, but it works. I will run the Almotions for a while longer, then see how slow the Mondial feels. But I expect that this will be my trans-am tire.


Retro Geek Vs. Planned Obscelescence
Posted by valvejob in Projects, technical, Uncategorized on October 18, 2020
… back in my day …
My bike preferences and tastes were shaped in my bike-shop years around 1980. I like friction shifting, rim brakes with the cable routed out of the top of the brake lever, triple cranks with square-taper spindles, and leather saddles. I think traditional-diameter steel frames look normal and ride great, and wheels with fewer than 36 spokes are only for special applications. In many cases, changes from these designs do not solve any real problems, at least for my needs, and they create new problems of confusing proprietary non-standards and incompatibilities. The main purpose of “innovation” in bike design seems to be change for the sake of change and to manipulate people into buying new bikes in response to the allure of perceived progress, lust for the latest and lightest, and creating barriers to fixing the old bike.
This is a story about how a repair that should be routine gets complicated by changing industry practices.
When I converted the Brown Bike to 650b wheels in 2007, I installed a Harris Cyclery 13-34 cassette and new 26-42-50 chainrings on the existing TA crank. This made for a nice wide-range step-and-a-half sequence as described in a previous post. Eventually, the Brown Bike was replaced by the new Rohloff bike for utility and touring. Some of the parts were transferred from the Brown Bike to the Rohloff bike, but the rear wheel, cassette, and crank from the Brown Bike ended up on the new rando/sport bike.

Since installing this drive train in 2007, I had replaced chains many times, but the cassette had about 14,000 miles on it when the rando bike hit the road in December 2016. When it became time to replace the chain again, two years and 4,000 miles later, it was clear that the cassette was shot – the new chain was very noisy, shifting was terrible, and it felt about to skip.
It quickly became evident that a direct replacement for the cassette was not be had. Harris no longer assembled custom cassettes.
But a greater vexation was that the 13-tooth smallest cog appears to be extinct — 11 teeth seems to be the default. From a practical perspective, the lack of a 13 would mean that I need a smaller chainring on the front to maintain a useful top gear (no more than about 100 inches). Furthermore, a new middle ring would be required to keep the step-and-a-half-with-granny gearing sequence that I like. In addition to this immediate practical consideration, I think the trend towards smaller cogs is bad because smaller cogs are less efficient for power transfer and they wear more rapidly.
The TA Pro 5 vis (usually referred to as “Cyclotouriste”) crank transferred from the Brown Bike has seen use and abuse for many miles and many years. Aluminum has a finite fatigue life, so I decided that it might be prudent to retire the crank from long-distance service rather than purchase new chainrings for it. The crank may go back on a bike intended for short trips, since rings are still readily available (Peter White seems to have the best selection), but I don’t want the crank to fail on a long ride far from assistance.
So I now have two major components to research and purchase: a cassette to replace the custom cassette that is no longer available, and a replacement crank and appropriate chainrings.
I eliminated some “update” options. If I converted to a 10- or 11-speed cassette, I would also need to replace the rear wheel (the hub is limited to 9 speeds) and the shifters (really intended for 7-speed so the cable pull is maxed out with 9). If I chose a wide-range cassette (like 11-42), I would still need new double chainrings to get the range I need and I would also need a new rear derailleur. Depending on the specifics, the cost of these changes could be significant, but I like the current arrangement and these changes would not add to the functionality of the bike.
I chose a Shimano XT 11-34 cassette and replaced the 11 with a 12. I seriously considered an IRD, but it does not work well for step-and-a-half gearing because the cogs are not sized with consistent percentages between steps.
I wanted a crank that would last, forged of good aluminum alloy, square taper bottom bracket, real triple (rather than triplizer chain ring), a reasonable Q factor, and with readily available chainrings. After much deliberation, I chose a Rivendell Silver, cold forged of 7075 T6, with standard 110/74 bolt circle diameters. I am not wild about the chunky styling, but it meets all the technical requirements. The rings that come with the crank aren’t quite what I needed, so I purchased a two Stronglight rings (38 and 46) from Peter White.
When I attempted to install the crank, I discovered that the newish 126 mm SKF bottom bracket spindle on the bike was much too long (Riv warned me, but I didn’t believe them). After trying a few other spindle lengths, I confirmed that a 107 mm BB (previously used with a single chainring on the 7-speed IGH Schwinn) was the appropriate width, even for this triple. This old BB is basically sound but it has a lot of miles on it and will need to replaced soon.
One final complication: With the 46-tooth large chainring, the front derailleur could not be mounted low enough because the end of the derailleur runs into the chain stay. It still shifted reasonably well but dumped the chain with unacceptable frequency. I did not think a derailleur designed for two chainrings would work well because it is still dealing with a big range of chainring sizes. My solution was to cut down an IRD triple derailleur that I had in the parts bucket.


I am happy with the result, though it is not perfect. I have 21 usable gears with one or two near duplicates and a range of 18 to 100 gear inches (1.5 to 8 meters). But I would have been happier I had only needed a new cassette.


Bike frame design — the myth of vertical compliance
Posted by valvejob in Analysis, Frame design, technical on July 13, 2020
The notion of “vertical compliance” is built into bike lore, and everybody knows that frame design and frame materials influence compliance.
But this is a myth.
The conventional diamond frame is a triangulated truss with little opportunity to flex vertically. Allee posted this link that documents an experiment performed by Mike Iglesias showing that a diamond frame is essentially rigid under normal vertical loads.
The tests were confined to conventional frames. It is possible that compromised triangulation – for example a steeply sloping top tube, or maybe unconventionally long chain stays with no additional triangulation, would allow some flex in the structure.
The test also showed that there was some flex in the fork. That makes sense, since the fork is not triangulated as is the rest of the diamond frame. There was even variation among the forks in the test, all of which were chro-mo. The amount of fork deflection was in all cases a significant fraction of the deflection in the tires (probably hard little road racing tires). This would be interesting to pursue further to see if fork materials, tube diameter, wall thicknesses, curve characteristics, total offset, head angle, etc. make a significant contribution to rider comfort. I would speculate that a unicrown fork with 31.8mm diameter blades does not deflect much; a fork with straight blades (angled at the crown) would deflect less than a fork with curved blades; a steel fork with 1.2 mm walls (for disk brakes) would deflect less than one with 0.7 mm walls (Reynolds 953); and more offset and shallower head angles would allow more flex. Determining whether those differences are significant and whether they would make a difference to the rider’s comfort would require some experimentation.
The bottom line is that tires provide more suspension than conventional frame components (with the possible exception of the fork) and are highly tunable. Larger tire volumes provide more suspension travel; lower pressures provide lower spring stiffness; lighter tread and sidewalls may be more effective at absorbing shock because of lower unsprung weight.
The Iglesias experiment examined only vertical compliance. Deflection at the bottom bracket with pedaling and the tendency to keep the head tube and seat tube parallel under the complex loads of cornering and maneuvering, especially while carrying significant baggage mass, can still be changed with frame design and material specification.
Iglesias looked at static loads but did not look at vibrations. It is well documented that vibration causes fatigue, so the intensity of vibration can be a real concern, especially for riding long distances.
The fact that common bike frame materials are used for musical instrument components suggests that none have intrinsic damping characteristics, but there may be differences in resonance or transmission of vibration outside of resonant windows. This also may be worth looking into, but my intuition tells me that if there is no vertical give, there can’t be much damping of vibration, and there should be little or no variation with frame design or materials.
While I was pondering about how one might explore vibration characteristics, I realized that I already own an accelerometer that might be capable of making appropriate measurements – my smart phone. And sure enough, the app world was way ahead of me and there are several apps available for vibration analysis of machinery. So I downloaded an app and started experimenting.
I do not have a fleet of CF, Ti, and Al bikes, but I do have a couple of steel bikes with very different frames, and I know the details because I built them.
For a preliminary proof-of concept experiment, I compared vibration transmission of two bikes over three surfaces. I must emphasize that my methods were crude, so this is preliminary at best, and nearly worthless at worst. However, I think it demonstrates that a smart phone has potential for this application.
Bike 1 is the touring bike. It has heavy-gauge oversize main tubes, heavy and long stays, and moderately heavy fork blades. The tires are Schwalbe Almotion which are not extremely stiff, but not particularly flexible, either. They measure about 45mm wide.
Bike 2 is the rando bike. It has light main tubes, lighter but shorter stays than the touring bike, and Kaisei “Toei Special” fork blades that are claimed to “provide passive suspension that improves both comfort and speed.“ Tires are Rene Herse Loup Loup Pass 38 mm with extra light and flexible casing.
The three surfaces are 1) fresh, smooth asphalt; 2) weathered, pebbly asphalt; and 3) gravel (see photos below).
I ran each surface at 65 psi and at 35 psi. The phone was placed at the back of the top tube to capture the vibrations transmitted through the frame to the seat post, and at the front of the top tube to capture vibrations at the handlebar.
The app generates a tremendous amount of data, but it seems to me that the important part is the vibration amplitude in the vertical direction expressed as root mean squared (RMS) acceleration.
Resonant frequencies were mostly around 8 to 12 Hz, with a few exceptions that I cannot explain. There was an unexpected amount of vibration in the horizontal plane, sometimes almost as high as the amplitude in the vertical direction.


These preliminary results indicate that as far as vibration goes:
- Nothing matters much on smooth surfaces.
- Frame doesn’t matter much.
- Fork doesn’t matter much (I was surprised to see that the vibration amplitude was greater in front in several cases).
- Tire characteristics don’t matter much except on gravel.
- Tire pressure matters a lot, and it matters more as surfaces get rougher.
Let me again emphasize the crude nature of my experiments. I think there is probably some bad data. I did only one run for each situation, and multiple runs would be required to confirm accuracy. I did not control for several variables. But I do think that this approach could provide some insights if the experiment were designed better. And it would be interesting to see different frame materials tested. If I get motivated, I might explore this further.


Other posts on frame design:
Bike Frame Design – the influence of tubing diameter and wall thickness
Bike Frame Design – strength of steel frame tubing
Bike Frame Design – strength of steel frame tubing
Posted by valvejob in Frame design, technical on May 21, 2020
Frame tubing is not a simple material. The manufacturer must maximize yield strength and ultimate tensile strength (impact strength is desirable, too) while maintaining enough ductility to enable the frame manufacturer to add curves to fork blades and chain stays (ductility also allows a relatively gentle failure mode), allowing machinability, and allowing joinability by welding or brazing, all with an economically viable manufacturing process.
The factors that go into creating these properties include the specific constituents added to the alloy, amount of work hardening in drawing the tubes, and heat treatments (quenching from an appropriate temperature, then controlled heating at optimum temperature for optimum time). Every variation in alloy recipe requires different treatments to reach its optimized properties.
The table below includes yield strength and ultimate tensile strength (UTS) for some readily available commercial bike frame tubing. For illustration, I have also included some steel alloys used in less expensive bikes along with generic 4130 chromium molybdenum steel (chro-mo). I will use my most comfortable old-guy reference point (Reynolds 531) to compare other products. Yield strength seems to me to be the more relevant property (rather than UTS) for bike frames, since exceeding yield strength (by running into an unyielding object, for example) will likely require major intervention to make the bike rideable again, even if the UTS was not exceeded.

Strength properties of commonly available bicycle frame tubing.
I am not certain what steel alloys are usually used in low-end bikes, but I have seen stickers for both 1020 and 1040, and those materials seem representative. These are plain steel with 0.2% and 0.4% carbon, respectively, with a pinch of phosphorus and manganese.
The first, 1020, would require tube walls twice as thick as 531 (and twice as heavy) to get the same strength. As far as I can tell from my limited research, 1020 would not be improved much by heat treating. Welded/seamed 1020 steel is far less expensive than fancier tubes and can be made into a bike that is acceptable for many uses. I am certain that many million happy miles have been ridden on bikes made from 1020 or similar steel alloys.
Much to my surprise, cold-rolled 1040 steel has properties that are similar to cold-rolled aircraft 4130 chro-mo. As shown in the table, the characteristics of 1040 can be altered by heat treating, but I am not sure that the properties relevant to bike frames would be improved over a cold-rolled tube. Furthermore, the limitations of the material do not justify the added cost of further processing. I have seen butted tubing that was 1040 or similar, but it seems like butting goes well beyond diminishing returns for this material. In practice, 1040 is significantly less strong than proprietary tubing, but is a step up from 1020.
Properties of 4130 chro-mo can be widely modified by heat treating. Most of the proprietary tubes on this list bear some resemblance to 4130, so the range of potential properties for 4130 illustrate the range of possibilities for those tubes as well. However, I need to emphasize that hardened (as quenched) 4130 would not make an acceptable material for bike frames, since it would have reduced ductility, it would be difficult to machine, and welding or brazing would create unacceptable weak areas at the joints. I think it is safe to assume that any 4130 tubing sold as bike tubing, especially if it is butted, would have the appropriate treatment to get it to approximately the same strength as Reynolds 525.
Old-school Reynolds 531 and 753 and Columbus (SP and SL) are no longer manufactured because they are not acceptable for welding, and I have seen comments online that suggest that they are inferior to their modern counterparts. However, they look competitive with medium-level modern tubing if your joining tool is a torch.
The tubing varieties that are 15% stronger than 531 (around 800 MPa yield) would allow construction of a frame one step lighter (i.e. .9/.6/.9 to .8/.5/.8) with the same strength (and same tube diameter). The next level (900-950 MPa) would allow going two steps lighter (.9/.6/.9 to .7/.4/.7) with the same strength.

Other posts on frame design:
Bike Frame Design – the influence of tubing diameter and wall thickness
Bike frame design — the myth of vertical compliance
My Rohloff Experiences
The Rohloff is a 14-speed internal-gear hub (IGH) manufactured in Germany. It was originally designed for the abuse of mountain biking, so it is more robust than other IGHs intended for round-town utility use. The Rohloff also provides the wide gear range needed for mountains and trails, and the gears are evenly spaced.
The durability and wide gear range also make the Rohloff suitable for touring and trekking. For those reasons, I built my touring/utility bike specifically for a Rohloff.
There is a lot of information about Rohloffs on the web, but there are two sources that specifically focus on touring use that I would consider definitive. CyclingAbout.com, written by Alee Denham, is a trove of touring information and experience. This post discusses Rohloff basics in some detail, and there are further discussion of various practicalities and experiences pertaining to Rohloffs within CyclingAbout. If that is not enough information, Andy Blance at Thorn Cycles also has vast personal experience with Rohloffs, and as a boutique manufacturer he can also tap into customer experiences and has access to information straight from the manufacturer. This treatise on the subject has further insights and information. The marketing for Thorn that is mixed in is understandable under the circumstances.
My experiences are much more mundane than those of Allee and Andy. My bike was originally conceived for the TransAm trip planned for this spring (now on indefinite hold) and I have done some two- to four-day touring/camping trips on it. But most of the nearly 14,500 miles (23,000 km) on the bike have been commuting and in-town utility riding.
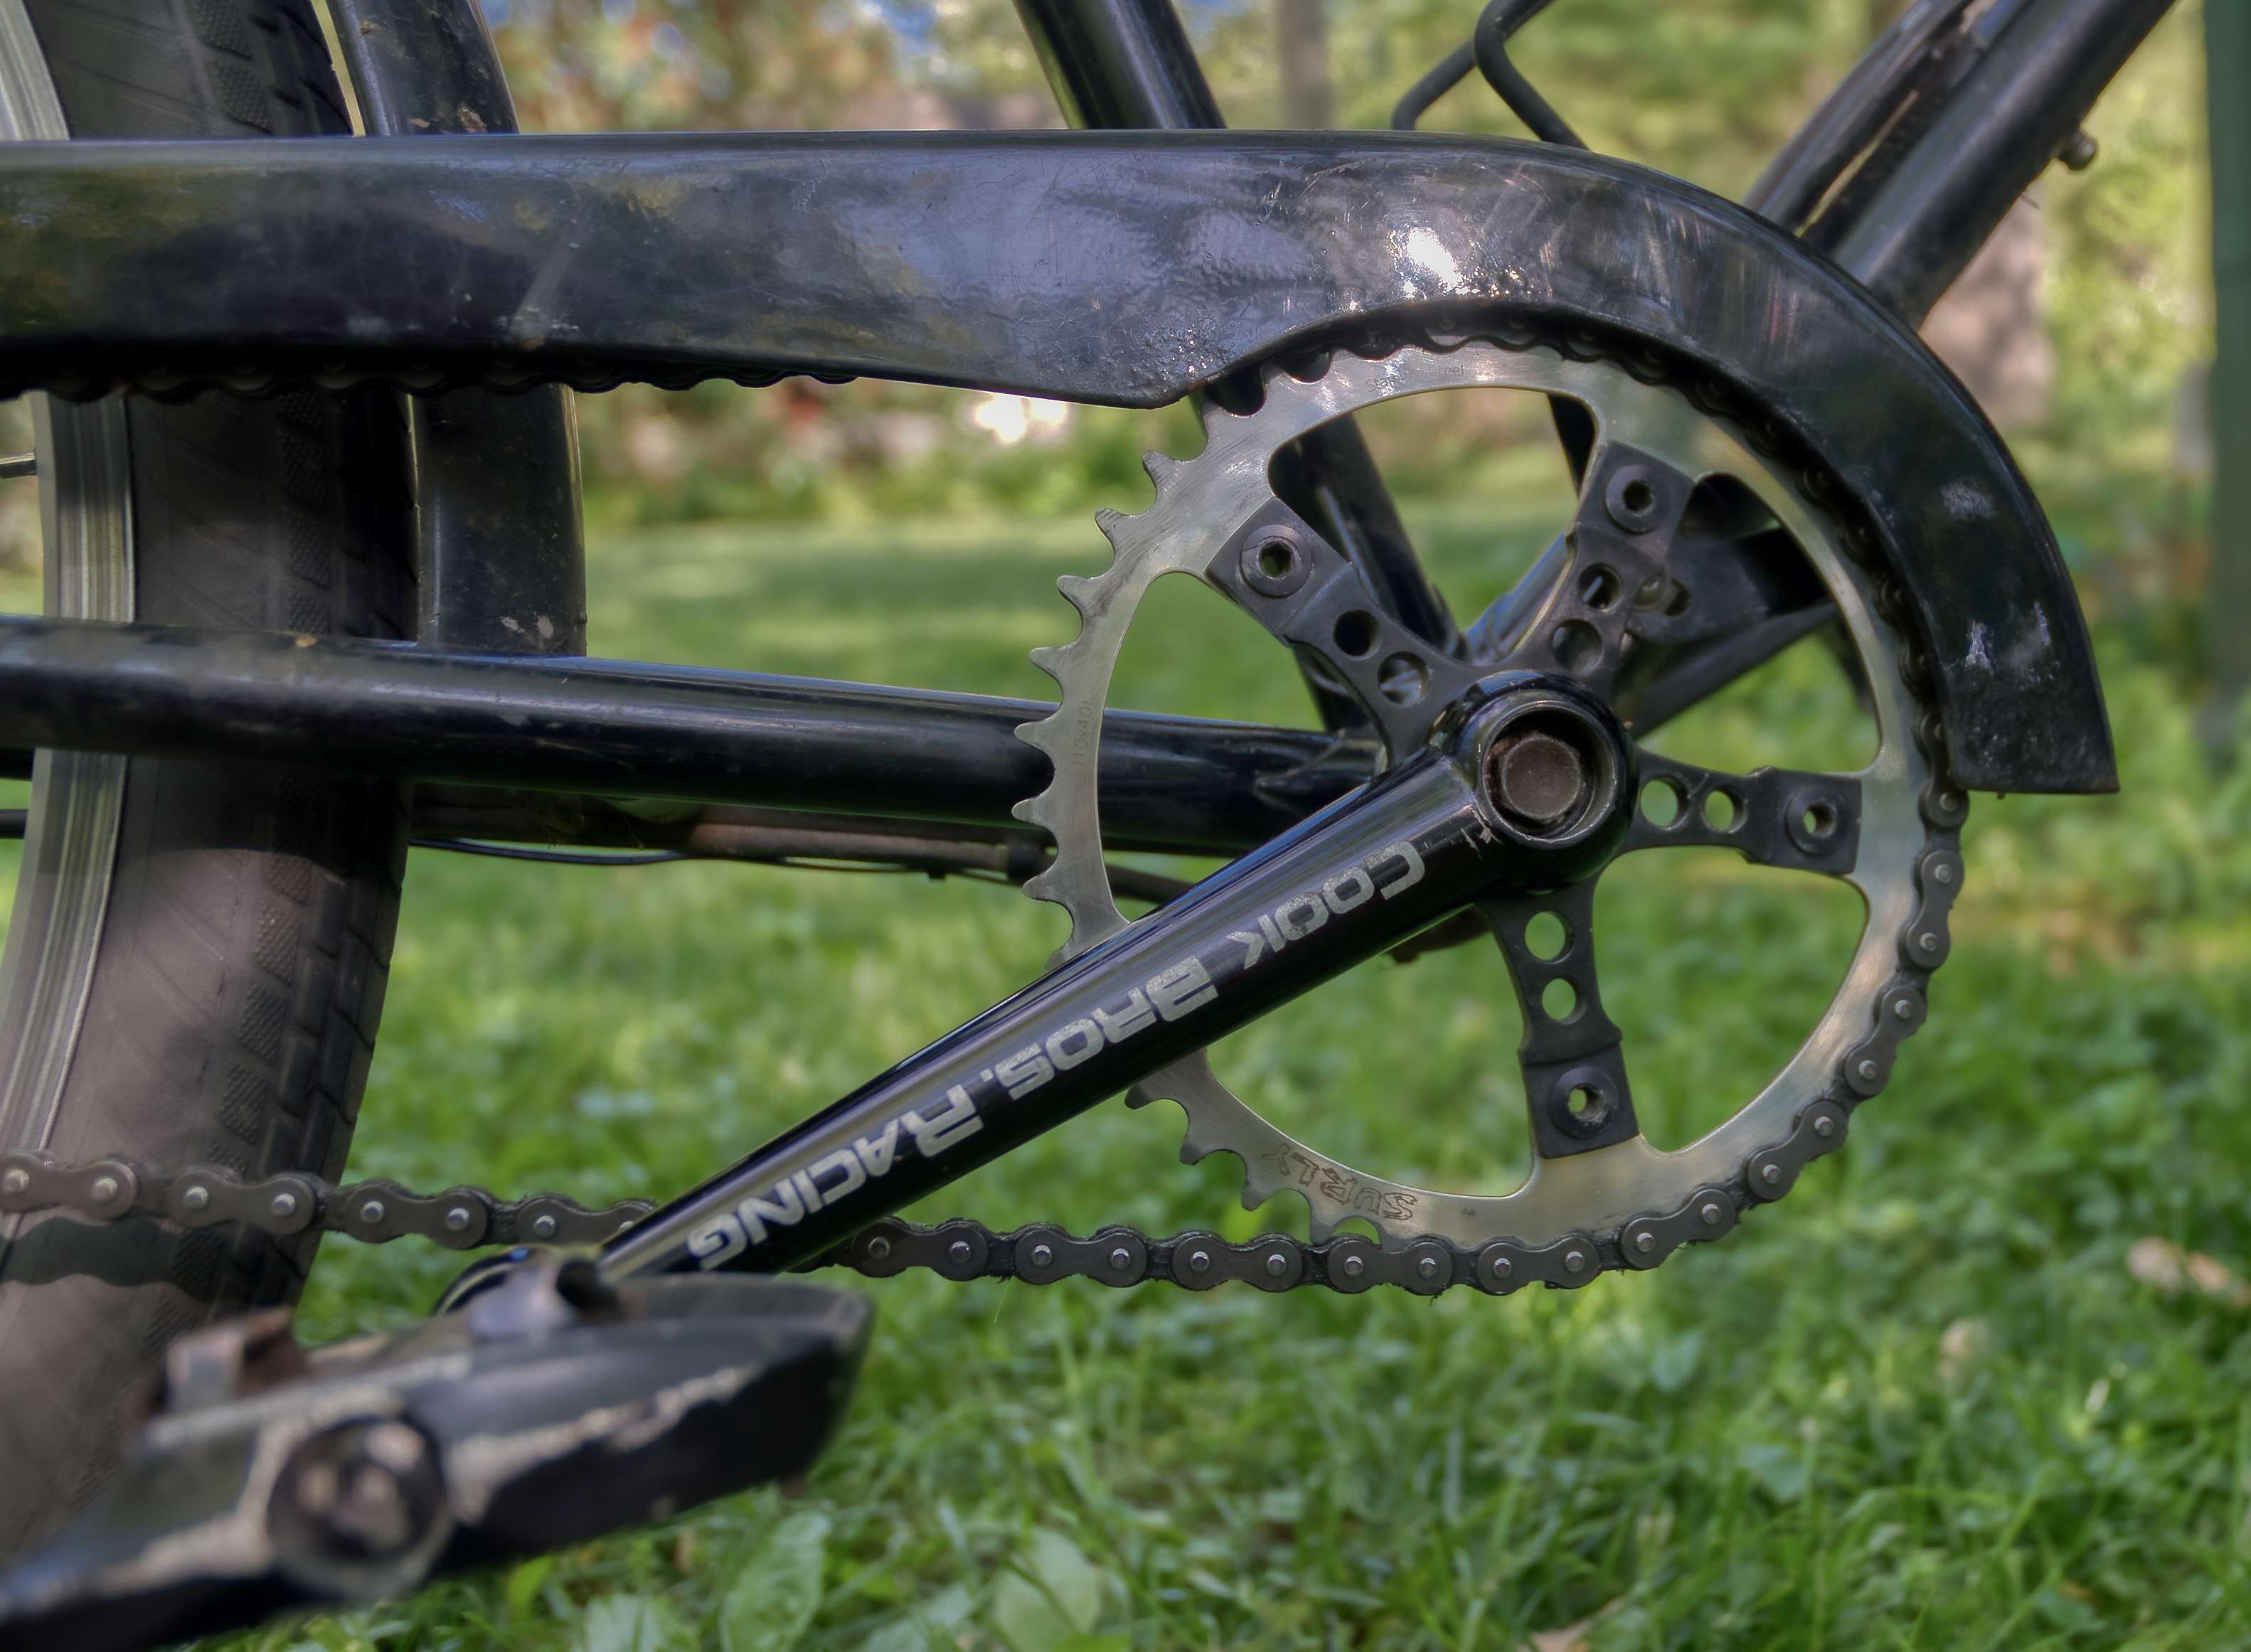
The hub has lived up to its reputation for reliability with a few caveats. Initially, I observed unexpectedly rapid chain and cog wear. In comparison to a derailleur system, wear should be slow because of the chain is always in a straight line between the single cog and chainring (though this is partially canceled by the fact that all wear is on that single cog and chainring rather than spreading the wear out across two or three chainrings and five to eleven cassette cogs). I had a suspicion about the cause of the rapid wear – the chainring was not centered on the Campagnolo Sport crank, so chain tension varied through the pedaling cycle. I originally chose this crank because its three-arm steel look went with the “old 3-speed” theme of the bike, and because I think it looks cool. But when I replaced the Campi crank with a Cook Brothers crank pirated from my mountain bike, chain tension became constant and chain and cog wear slowed down tremendously. When I made that switch, I also installed a Surly 40 tooth stainless steel chainring, which should add further durability. I am puzzled as to why Rohloff does not have a wider chain (1/8”) option since there is no real advantage to using derailleur-width chain on an IGH, and wear rate would be even slower with a wider chain.
The shift cables lasted about 10,000 miles (16,000 km) before they started fraying inside the hub-mounted cable box. The cables wrap around a small pulley that turns the gear changing shaft, and the cables began fraying at the pulley.

I confirmed that it is possible to replace the Rohloff cables with standard derailleur shift cables, but the head of the most-common cable is a little bigger and must be filed or sanded to fit in the shifter (Campagnolo-standard cable heads are smaller and would fit). In addition, standard cables are a little thicker which makes installation on that little pulley more difficult, and I would expect that the tight bend would make a thicker cable fray more quickly, though that is an untested hypothesis. I would recommend sticking with cables manufactured for the Rohloff.
As a gearing freak, I was not sure that I would be happy with the 13% steps between gears. It is tempting to set the system up with a front derailleur with half-step (or maybe step-and-a-half to get a little more range). But in practice, it is rare that I want a gear between those available; as the gear chart shows, I can stay between 85 and 95 rpm through the gear range. And the additional complexity of a double crank, front changer, shifter, and chain tensioner cancels out some of the advantages of an IGH system.
After some trial and error, I have settled (for now, at least) on a 40-tooth chainring and an 18-tooth rear cog (tires are 45mm 650B [584]). This provides a 16.5” low gear (see gear table), low enough to grind up a 10% grade with a loaded bike. If I maintain my sustainable power output of about 100w, I will climb that 10% slope at about 2 mph (3.2 kph) at 40 rpm. More likely, I will push a little harder and/or stand up, though I may regret the greater effort later in the day. With first gear that low, the high gear is also relatively low. That does not matter much, since maintaining that 100w means that I only push the limit on downhills, and I coast or tuck at higher speeds. I can maintain 115 rpm for a short distance, and I don’t go that fast very often.
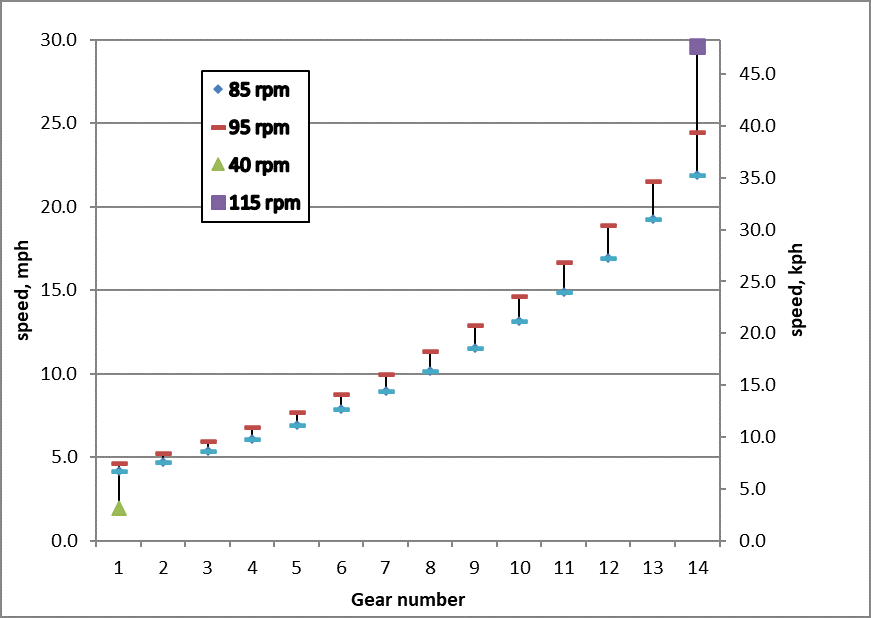
Hayduke diagram and gear chart for Rohloff hub with 45-584 (650B x 45) tire, 40-tooth chainring, and 18-tooth cog.
| Gear # | Rohloff Internal Ratio | Gear, inches | Gear, meters development |
| 1 | 0.279 | 16.5 | 1.31 |
| 2 | 0.316 | 18.6 | 1.49 |
| 3 | 0.36 | 21.2 | 1.69 |
| 4 | 0.409 | 24.1 | 1.92 |
| 5 | 0.464 | 27.4 | 2.18 |
| 6 | 0.528 | 31.1 | 2.48 |
| 7 | 0.6 | 35.4 | 2.82 |
| 8 | 0.682 | 40.2 | 3.21 |
| 9 | 0.774 | 45.6 | 3.64 |
| 10 | 0.881 | 52.0 | 4.15 |
| 11 | 1 | 59.0 | 4.71 |
| 12 | 1.135 | 66.9 | 5.34 |
| 13 | 1.292 | 76.2 | 6.08 |
| 14 | 1.467 | 86.5 | 6.90 |
The shifter that Rohloff makes fits on flat handlebars only, but there are several options manufactured by others for drop bars (another subject tackled by Alee). I chose the Co-motion shifter, mostly because it fits close to the stem and therefore does not use as much handlebar real estate as the similar Berthoud shifter, so it leaves more room for moving my hands around on the bars. This shifter works fine, but it is intended for larger-diameter handlebars and requires an adapter shim. The edge of the shifter is a little sharp and causes some wear on gloves and I develop a small callus in warm weather when I ride gloveless. These minor annoyances do not even come close to a level that would motivate me to toss the shifter and try something else.
The location of the shifter and the cable connections on the shifter create a conflict between the front rack-top bag and the cables. I installed noodles to route the cable around the bag, but the noodles added a significant amount of cable friction. This makes the shifting more vague leading to some shifting errors. There is currently a flexible noodle and a rigid noodle on each cable and I will try two flexible noodles. Maybe I will end up living with the shifter rotated so that the cables exit downward with the gear indicator out of sight.
The Rohloff is not a game changer, but it is a departure from the derailleur paradigm. The simplicity, durability, and gear range make it feel like the best choice for my purposes.

A Measured Rant – Metrication and Bikes
During the time I worked in bike shops (1977 until 1987), we had four different standards for bike parts and dimensions to deal with: USA, English*, Italian, and French. There were also variations such as Raleigh and Swiss.
Basic US-made bikes, usually with single-speed coaster brakes, were all fractional inch — tubing diameter, ball bearing size, threading on axles — and they used US-standard fractional-inch wrench sizes. As you went up in price point, more components (hubs, brakes, derailleurs) were used that were manufactured in Europe, and these parts used European standards, usually English. A medium quality American-made 10-speed had a mix of US-standard and English-standard threads and fasteners, requiring both US and metric tools. High-end American bikes were entirely English (or sometimes Italian) standard.
Metrication officially began in the UK in 1965 with a government policy to encourage the switch. That process was not complete when English bike standards were established and frozen in place (and it still is not really complete). In the English bike standard, some bike parts are fractional inches (ball bearings and frame tube diameters; bottom bracket shell diameter and threading; chain pitch and width; pedal axle diameter and threading). But wheel axles used metric diameter and threading specifications, and all the wrenches you needed to work on these bikes were metric (those Whitworth wrenches that were sometimes needed were throwbacks).
The Italians mostly followed the English standard (or evolved to the same place by a different route). The biggest differences were bottom bracket, freewheel, and axle threading that was a mixed-up hybrid of metric diameter and inch-base thread pitch.
French bikes, as might be expected, were almost fully metric – even frame tube diameters were in millimeters. The only exceptions that I know of were those fractional-inch ball bearings and the standard inch-pitch chain.
In the English-speaking world, gear ratios are expressed as gear inches, a dusty old traditional measure that refers to the diameter of an equivalent direct-drive high-wheeler wheel (in inches, of course). The metric equivalent is meters development, the distance traveled with one pedal revolution.
The chaos that is tire and wheel sizing deserves its own discussion (Sheldon is definitive). A good example is the seven different non-compatible tire sizes that can be called 26”*. This bedlam was further confused when some marketing geniuses created new names for existing tire sizes: 29” (formerly known as 700c or 28”) and 27.5” (formerly known as 650b or 26×1½). In a previous post, I noted that you have to look under at least three different size designations to find 650b (584) tires in various manufacturers’ catalogs.
The International Standards Organization (ISO) made things a little more consistent by designating the English standards as the international standard. This has already occurred in practice when the Japanese bicycle manufacturing industry, which used the English standards, took over the world, eliminating much of the European competition. ISO standardization makes life easier for the mechanic, but it has pretty much eliminated the manufacture of replacement parts for French and Italian bikes, creating a real challenge for anyone trying to fix up an old Peugeot or Bianchi. The ISO standards recognize the reality on the ground, but if evolution to full metric standards is a goal, they should have adopted the French (or Swiss) standards.
Since I tend to stick with old or old-style parts, I am not up on the recent proliferation in bottom bracket and axle specifications, and I do not know whether they are consistently metric or not. But I suspect that they are as confused as the rest of the bike world.
ISO also established a tire size standard that is simply the tire width and wheel diameter (for example 42 – 584 designates a 42mm-wide 650b tire). Unfortunately, it makes too much sense to be adopted into common usage.
An assistantship in graduate school allowed me to leave the bike shop world behind. At the end of my training as an engineer, I had been working with the metric system for seven years. I was comfortable with meters and liters, hectares and newtons.
When I left the ivy-covered halls, I was reminded that the metric system is not a part of the culture of the US. As a country, we would rather deal with the absurd and cluttered conversion factors of the traditional system — inch, feet, yard, mile; square foot, acre, square mile; ounce (dry, avoirdupois, or fluid?), pound, cup, peck, gallon, cubic inch. Though a few metric standards are slowly creeping into regular usage, the civil engineering world at the municipal level is still entirely stuck on using US traditional units, though they have made the small simplification of decimal feet (and no rods or chains). I am sure that as a country we waste millions of dollars every year on calculation time and incompatibility with international standards.
The metric system, is of course, much more tractable with its powers-of-ten conversions between different scales/orders of magnitude. Perhaps more importantly, it makes an unambiguous distinction between mass and force. The metric unit of mass is the kilogram; the force unit is the newton. The relationship is as basic as Newton’s first law (F=Ma). In contrast, it is unclear whether you need to multiply a pound by g to get force or divide by g to get mass. This has led to the occasional and inconsistent use of lbm , lbf (pounds mass and pounds force) and slugs (mass).
Since most of us don’t do many calculations involving acceleration, the difference between force and mass is still hazy in everyday life. But that does not excuse the abomination of using “kilogram force” for spoke tension measurement. The engineers at Park Tool should be ashamed.
When I write, I tend to use the units I am most comfortable with. To a large extent, that means US customary miles, inches, and gear inches. I frequently find it easier to use millimeters over fractional inches, but millimeter equivalents for fractional-inch standards can be clumsy (1 1/8″ is easier to say than 28.575 mm). In this blog, for clarity (and so I can practice), I will endeavor to include metric or US equivalents in parentheses as appropriate, but I don’t always remember. I will also try to use ISO descriptions for tire size.
*Perhaps more accurately “British” or “UK” but “English” was the common designation.
**Rim diameters of 26” wheels: 1) 559 (mountain bike), 2) 571 (650c), 3) 571 (US hook bead), 4) 584 (650b), 5) 590 (650a, 3-speed), 6) 597 (Schwinn 3-speed), 7) 599 (old US lightweights). Two of these are so old and obsolete that they could be ignored. But still.
Carrying stuff: weight distribution and frame design
Posted by valvejob in Analysis, Frame design, technical on October 20, 2019
There are a lot of opinions, and some passion, in the bike touring and utility-cycling worlds about distribution of weight and the best design for bikes intended to carry loads.
I would like to contribute my observations to the discussion. These observations are based mostly on trial and error with little in the way of controlled experiment, but I have been messing around with bikes for decades and have a lot of accumulated experience, anecdotal though it is. I have experienced all of the commonly described problems caused by touring loads front and rear: shimmy, wobble, instability, slow steering, difficult low-speed handling, bikes too unstable to stand up to pedal, and I have found ways to overcome those problems in ways that work for me. Your results may vary.
I would generalize my observations in the following principles for heavy touring and utility loads.
- Rigidity is a critical characteristic for racks. Loads that sway and shift wreak havoc with stability and handling. My current Tubus rear rack (with large-diamater steel tubing) enabled noticeably more stable handling than my previous rack, even though the predecessor was made by a reputable manufacturer (Blackburn aluminum). Inexpensive, flimsy, non-triangularized racks can be a handling nightmare with a significant load (I am looking at you, Pletscher).
- Mounting loads lower is better. I don’t know how important this factor is by itself because I have made other changes at the same time that I lowered the weight, but it makes intuitive sense that it is a good thing.
- For rear loads, longer chainstays are better. The farther the load’s center of mass hangs behind the rear axle, the more it unloads the front wheel and the worse the handling and potential issues with shimmy become. Chainstays on traditional touring frames are usually around 17.5” (444 cm) for a good reason. Longer than that can be even better. Bigger frames should have proportionately longer chainstays, which is not the usual practice.
- Front loads should be close to the steering axis. Every change in course and every steering adjustment to maintain balance is impeded by the inertia of the load. This effect can be minimized by reducing the distance the load travels when the handlebars are turned. The usual American handlebar bag is farther from the steering axis than a rando-style rack-top bag, so the latter has less impact on handling. Low-rider front racks place panniers as close as possible to the steering axis and thereby allow better handling than a rack with a high mount. And front baskets and porteur racks, mounted high and far from the steering axis, create a handling challenge with a substantial load. Low-trail frame geometry helps mitigate the heavy steering caused by front loads but does not erase it, and the above observations still apply.

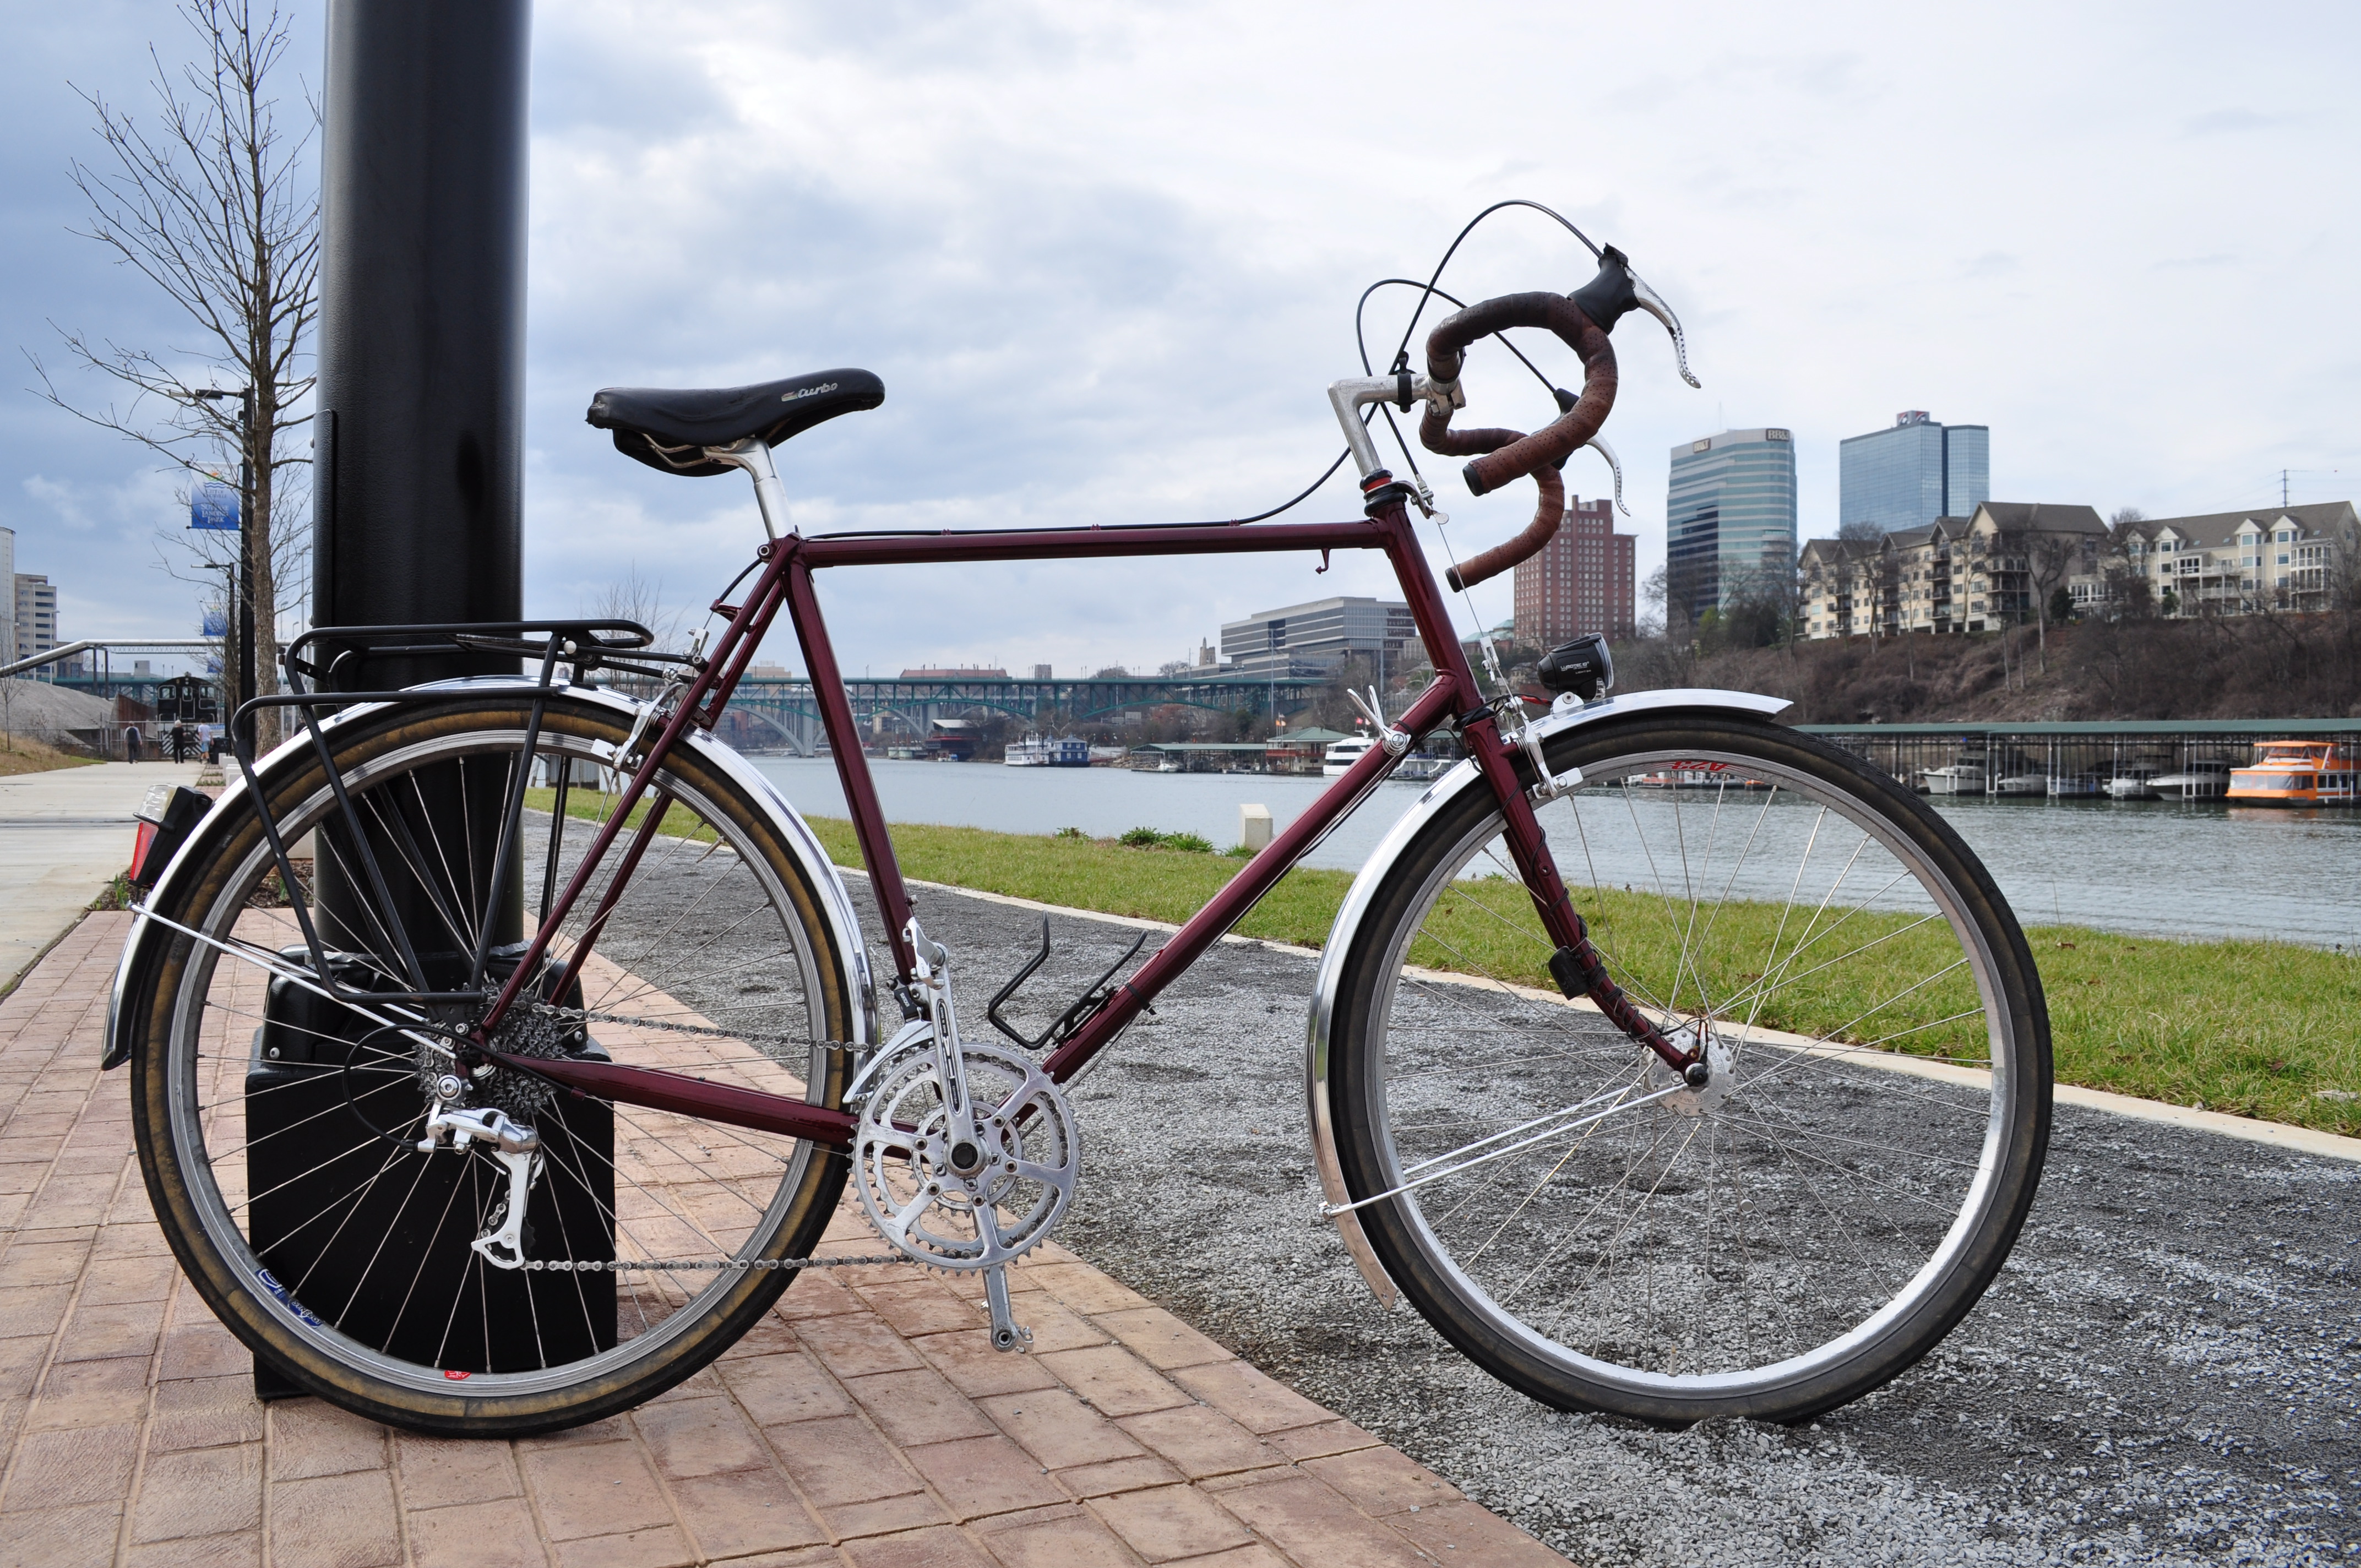
My current touring/utility bike (link) has extremely long chainstays. I hardly notice a rear load, even 40 pounds or more (except up hill, of course). It has lower-than-average trail (50 mm) and can handle a pretty good front load, too, but it feels best if the front load is limited to 15 or 20 pounds. Other than that arbitrary limit on front load, the ratio of front to rear load does not seem to make any difference.

The dead weight of the payload can be hard on rear wheels, though I have never broken a spoke on tour (though I have bent a front wheel on an unexpected obstacle). Wheel specifications are important, and I may get around to doing a future blog on speccing strong rear wheels.
More discussion on the subject.
http://www.cyclingabout.com/best-carry-load-bicycle-touring-front-rear-panniers/
http://www.adventurecycling.org/default/assets/resources/200906_MechanicalAdvantage_Heine.pdf
Other posts on frame design:
Bike Frame Design – the influence of tubing diameter and wall thickness
A frame project
Posted by valvejob in Frame design, Projects, technical on March 18, 2017
I decided I needed a sporty bike with wider tires than will fit on the Early, so I built a new one. I equipped it with a few new parts, but mostly items scrounged from the Early and the brown bike.
It is pretty much full Heine Kool-Aid. Toptube is .7/.4/.7, downtube is .8/.5/.8 (True Temper Oxplatinum), and it uses the Kaisei fork blades and Grand Bois fork crown (and braze-on centerpull brakes) sold by Compass. I couldn’t find a True Temper chainstay with a curve I liked, so I went for Columbus Life cyclocross units. The frame design is conventional sport/touring 73° parallel with 17 inch chainstays. But the wide fork crown and curved chainstays, along with appropriate blade length and bridge locations, means that it will fit 42 mm 650b tires and fenders. It has a low bottom bracket and low trail.
The best analogy for its ride is a like a candy that is soft on the outside with a firm caramel center. The initial ride impression is cushiness, but it feels fast, handles very well, inspires confidence on descents, and there is no feeling of excessive flex, even under as much power as I can muster.
I will continue tweaking the components. The Turbo saddle in the picture is already gone, since it causes significant pain after 40 miles or so, and I borrowed the Early’s B17, which is much more comfortable on an extended ride. It now has a front rack and a new Berthoud bag.
More thoughts on tubing specifications and ride qualities
Posted by valvejob in Analysis, Frame design, technical on February 19, 2017
In a previous post, I noted that some highly respected people in the bike world assert that the frame tubing specifications make little or no difference to the ride. However, in my experience, there are some circumstances in which tube choices make a huge difference.
For example, there was a Monark Siver King at Stu’s for repair. It was an American balloon-tire kid’s bike, the frame of which was made from 1” round aluminum tubing. If I remember correctly, the bottom bracket deflection could be measured in inches as you pedaled, yet it had a surprisingly lively ride. My time with it was short, and I did not try it with a load, nor did I dive into any tricky corners; I suspect that with that much flex the handling could have been challenging.
Close to the same time (early 1980’s), I was at a Portland cyclocross race. Jim Merz, then a Portland frame builder, brought a bike to the race that appeared to be nearly as flexy as the Monark. The frame was steel (I think), and I don’t know anything about the specifications, but it must have had very thin walls. He was using the flexibility as a substitute for suspension and he was riding over some of the obstacles that made the rest of us dismount. He said something at the time about a good competition bike being “on the hairy edge of breakdown”. I did not ride the bike, and I don’t know how long that frame survived.
I have ridden two tandems that had frames that were clearly too flexible. Tandems are an extreme example because of the long tubes, double power input, and double human payload compared to a single bike.
One tandem was an American coaster-brake balloon-tire bike with 1” steel tubing, which usually means low strength steel and thick walls. While riding placidly it was pleasant enough, but anything other than a gentle change in direction would cause the frame to twist, bend, and buck and generally become a challenge to keep under control. Another tandem, a Gitane of traditional-diameter (unknown wall thickness but possibly tandem gauge) Reynolds 531 was better, but still could be a handful at low speeds and when cornered hard, and there was a lot of flex when accelerating or climbing. On the other hand, I have ridden tandems built with oversize and presumably heavier gauge tubing that handle just like single bikes.
In this vein, Mr. Weiss, over at Bike Snob NYC posted a link to a magazine article published in 1996 (back when steel was still taken seriously). The article is an account of a blind test of seven bikes with different frame tube specifications but otherwise identical design. It is remarkable that they assembled this group of bikes, but they could have made more of the opportunity.
In fact, they blew it. This group of bikes could have been ridden by a group of testers whose pooled observations might have yielded some real insights. And they could have performed some objective testing, like keeping track of lap times and measuring frame deflection. Instead, one rider/writer recorded his hurried impressions.
The writer, Alan Cote, had a great deal of trouble telling the tube sets apart by their riding properties. With only one observer (contrary to the impression given by the graphics accompanying the article), this could either mean that differences were truly too subtle to distinguish, or there were too many bikes and too little time to sort out all the sensory information, or maybe that Mr. Cote was not a good observer.
Cote reaches some preliminary conclusions, then appears to second guess himself when he is informed of the construction material of each bike. “I think my ride impressions were essentially random”, he says after he discovers that the tubing specifications do not necessarily correlate with his initial ride impressions.
All of these tube sets are steel, so the specific steel alloy (or associated tensile strength) makes essentially no difference in tube rigidity, and the alloy, by itself, should make no difference in ride qualities. Ride characteristics are determined by a combination of tube diameter and wall thickness. Of course a higher-strength alloy does allow thinner walls and lighter weight without reducing the total strength, so the alloy characteristics can influence the long-term usefulness of a frame.
Using my previous analysis and a subjective analysis of the other frame specifications, most of these frames should have similar characteristics, but there is enough of a range that differences should have been perceptible, at least in the frames at the extremes.
The most flexible frame should have been the one constructed from SLX tubing. It has the most flexible main triangle and the lightest chain stays, seat stays, and fork blades. Cote identified this bike as the “softest”, apparently only for power transmission. I don’t see any reason it would not also be the softest in its over-the-bumps ride.
I am surprised that he could not distinguish the straight-gauge (Aelle) frame. Unless we have been defrauded about the value of butted tubing over the last 120 years (a possibility I cannot entirely eliminate) there should be a noticeable difference between this and the other bikes. I found my Schwinn Sports Tourer, with similar tubing, harsher and less lively than comparable butted frames (though I recognize that that perception could have been because I knew it was straight gauge).
The stiffest frame should have been the Thron, with stout oversize tubing and heavier chain stays and seat stays. This frame should be 30% or more stiffer than the SLX, a difference I would expect a rider to feel both in lateral flex during pedaling and over the bumps. Cote called this the best at shock absorption, an impression that is surprising.
Cote’s favorite (which he called the “stiffest”) was the Neuron frame, made from tubing that used a complicated elliptical butting pattern. Based on its specs, I would expect that it should be only incrementally stiffer than the SLX. It is possible that the unique butting patterns provide a noticeably better ride, but if so, that fact did not save Neuron tubing from being eliminated from the Columbus catalog.
For a wine drinker who is happy with generic white wine, the difference between chardonnay and pinot gris is too subtle to bother with. But a wine journalist worthy of the name would easily identify the two, wax poetic about the contributing tastes and mouth feel, and maybe tell you what vineyard the grapes came from. A bike journalist should have a similarly well-calibrated sense of the contribution of frame construction to ride characteristics. Maybe the differences between these frames were subtle, and maybe any differences really don’t matter when it comes down to the overall riding experience, but I have a hard time believing that the differences were indiscernible. Bike journalism is driven too much by manufacturers’ (advertisers’) claims rather than educated, calibrated experience. This was a unique opportunity to improve the writer’s ability to judge ride characteristics (maybe bike magazines should have a stable of test bikes with known and validated characteristics for training aspiring writers).
Or, if a panel reached consensus, this test would have reached a defensible conclusion that frame material really doesn’t matter (at least within this range).
Instead, it was a lost opportunity.
Other posts on frame design:
Bike Frame Design – the influence of tubing diameter and wall thickness
Bike frame design — the myth of vertical compliance
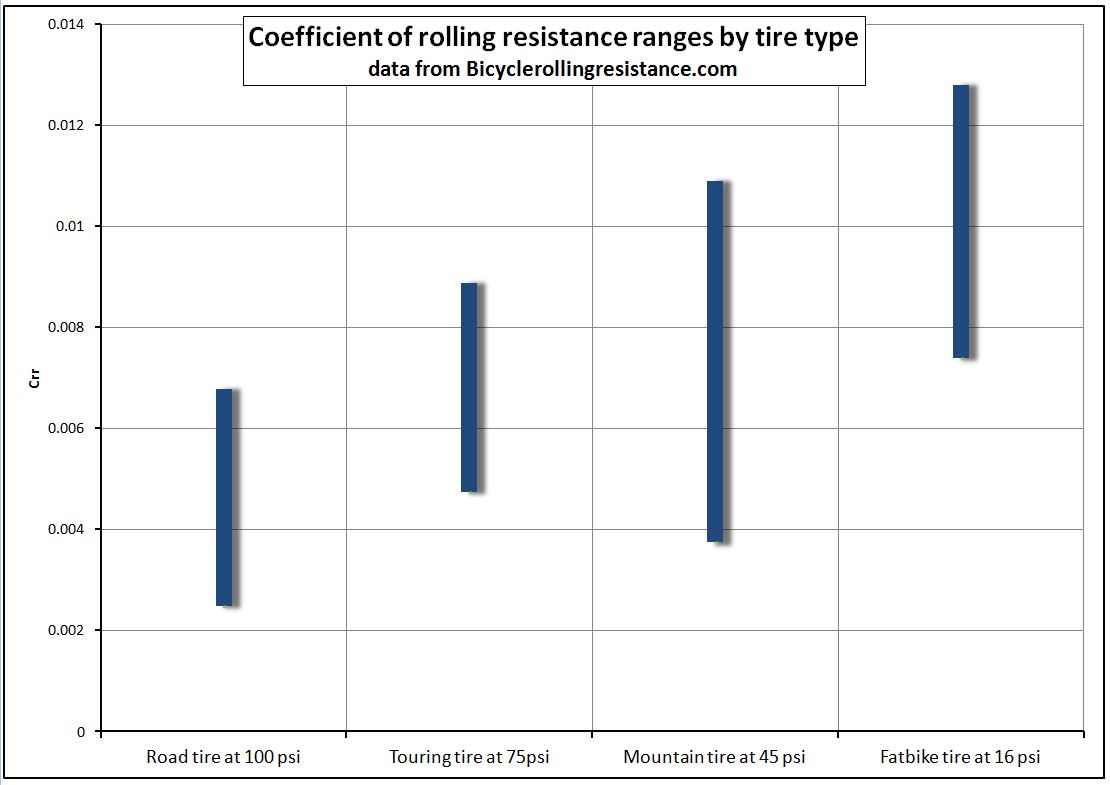
A little more about tires and rolling resistance
Posted by valvejob in Analysis, Product reviews, technical, Tires on January 14, 2017
Bicycle Rolling Resistance is a website run by Jarno Bierman in the Netherlands. Jarno* uses a roller to measure tire rolling resistance. The attraction of Jarnos’s work is that he uses a consistent method for a large number of different tires, and he uses a textured roller in an effort to account for energy loss from vibration as well as tire flex. The consistent test procedure gives me more confidence in his results than I have in roll-down test of just a few tire models, and the textured roller presumably approximates a real-world road surface better than a smooth roller.
However, he focuses on a narrow range of road tire sizes, staying close to 25 mm width. He treats stouter touring tires as a separate class, and he sticks to tires of around 37 mm for that group. Road and touring tires are all 700c. He has not yet directly explored the characteristics of wide light and supple tires.
He has, however, compared the rolling resistance of a particular model of high-performance road tires in different widths and concluded that the widest (28 mm) had the lowest rolling resistance (conti GP link ) . And he performed a similar test with a touring tire, showing that the 37 mm tire had lower rolling resistance than the 40 mm or 47 mm tire, while the 32 mm version had the highest rolling resistance for this tire model (Marathon link ).
However, the real outlier is in the mountain bike category. I am a little dubious of the usefulness of this test on knobby mountain bike and fat bike tires (since the knobs are larger than the roughness elements on the test roller — it seems to me that a more pertinent test would involve a rougher roller**), but the relatively smooth tires in this category should behave like road tires.
The best-performing tire in the mountain bike class has a rolling resistance that is competitive with the best 25 mm road tires, even with each class at inflation pressures appropriate to their widths. As one might expect, it has a very light tread and casing but measures 47 mm wide.
These results seem to show that wide/light/supple tires can be as fast as their proponents claim. Jarno has a long list of tires that he wants to test and not a lot of capacity to do the testing, but I would love to see him test some performance-oriented tires in the 38 mm range.
*I understand that you go straight to first names in the Netherlands rather than referring to someone with an honorific (e.g. Mijnheer Bierman) as you might in English. I prefer that informality, but I don’t want to sound disrespectful, and I apologize if I am incorrect.
**I think it might be useful to test tires on a series of rollers with different size roughness elements, comparable to Nikuradse’s experiments with pipes. This additional experimental data might provide some insight about optimum tires, width, and pressure for different surfaces.
